The 2-1-2 has been the Bosco Lions’ preferred formation since their existence. Other formations were experimented with in the early days, but this system enhanced the performances of their attacking players. Defensively, the Toronto-based side has never been strong, yet they always had an abundance of attacking impetus – and the players who were playing consistently for the first time had the potential to increase this threat.
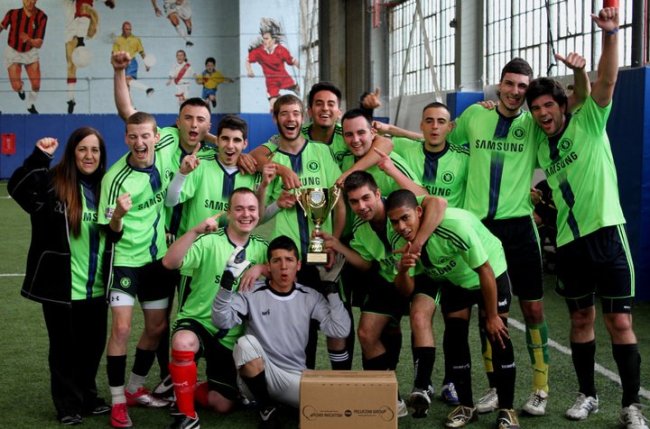
Flashback to three years ago; Sunday’s – usually utilized for leisure time or rest – brought together a group of friends that decided to form a soccer team. Initial success wasn’t expected, but the determination to win was evident. On a weekly basis these young men took the field in their bright lime green jerseys and put their bodies on the line for one another.
Their road to glory wasn’t a formality – penalty shootouts, nail-biting late winners and a surmountable attempt at revenge against rivals DMP is what led them to lifting a championship on a gloomy Sunday afternoon. They did the impossible. A team built to have fun and potentially grow into ‘winners’ did the unthinkable on their first try.
It’s easy to win a title, but defending the crown is a difficult task. The hunger was gone. Complacency snuck upon them, and although their confidence levels increased, they were unable to replicate such success.
What happened?
This team did encounter a few changes that conflicted with their natural balance, but as a whole they improved over the past three years. The core of the team is the same, and the players who were beginners at the time have improved vastly. These players know how to win, so what’s the issue?
They’ve won more games than they’ve lost during this period, but they fail to prosper when it matters. The dependency on individual brilliance hit an all-time high, and although this method of attack was positive, Bosco has been overrun in midfield on several occasions over the past few years.
Is there a talent issue?
No.
Bosco could field their five best players for longer periods of the match, and the chances of them claiming another title would still be slim. Their method of attack has become predictable, whereas they’ve yet to instill a proper defensive system.
However, despite all the flaws they hold, this Bosco side isn’t a lost cause. In short, they lack a bit of structure and tactical discipline. More so, this is a simple guide that can be beneficial towards these young men maximizing their individual talent. A key component that leads to success in indoor soccer is cohesion, and below I will explain what Bosco needs to do to achieve a cohesive system.
Intro
The 2-1-2 is a common formation used in indoor soccer that relies on two hard working strikers and an energetic, yet tactically disciplined midfielder – pretty much a box-to-box midfielder. Here, the midfielder has two jobs – they need to be able to link play with the attackers, but also provide astute defensive cover for the two defenders. Playing one midfielder is the risk, because there’s a great chance that your side is overrun in midfield, which is why this player needs to be tactically disciplined.
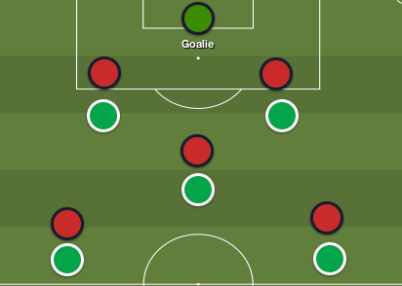
Base shape
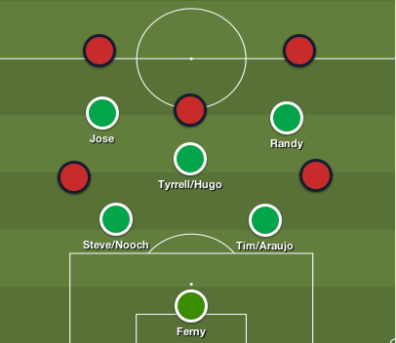
Bosco Lions 2-1-2
Bosco doesn’t possess two naturally gifted strikers so they often field two grinders upfront. Their main strength is in midfield, and while they do possess competent defenders, these men are attacking minded.
A key feat towards the success of this system is the positioning of the midfielder. In the past, he’s often positioned himself with his back to goal, or roamed higher up the pitch searching for space to receive the ball. This isn’t necessarily a bad thing, but the sole purpose of this system is to sustain possession, and hand the midfielder full control of the match.
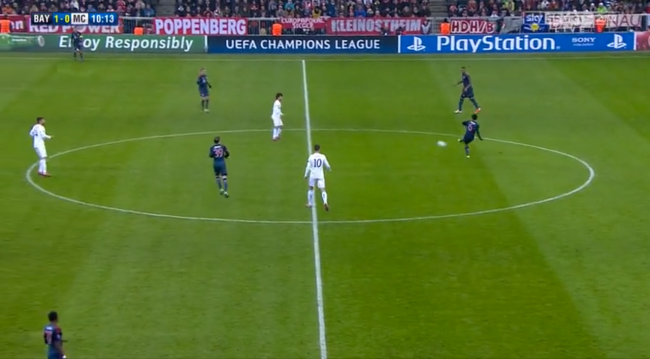
In retrospect, the system I’m about to present is similar to the way Pep Guardiola’s sides play. In the early days at Barcelona, Dani Alves would play as a right winger – which led to a great understanding with Lionel Messi and tons of goals from the right side – with Eric Abidal sitting back to provide balance. In Guardiola’s final year, Barcelona played a 3-4-3, which ultimately became a 3-3-4 as Alves bombed forward, and Sergio Busquets dropped in between the defenders.
David Alaba and Phillip Lahm are in the widest/highest positions on the pitch as fullbacks.
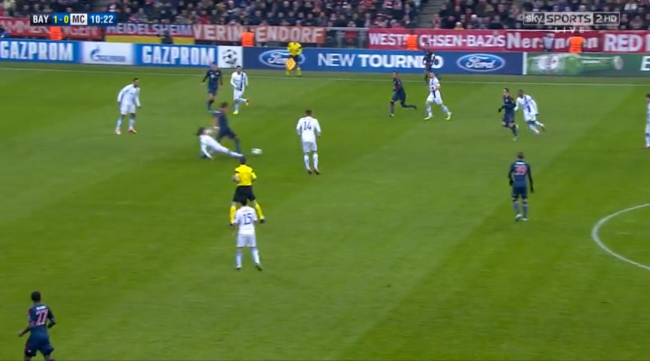
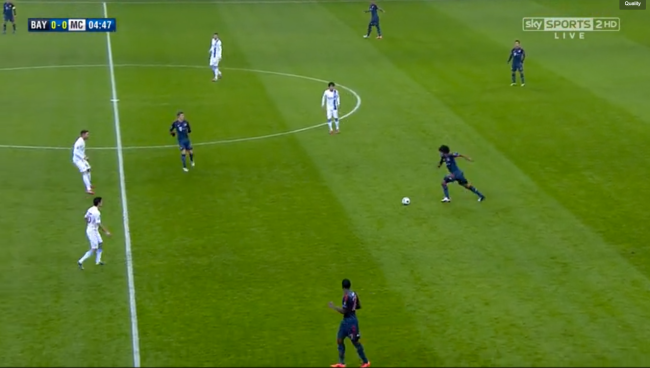
Now, Guardiola implements a 4-1-4-1 at Bayern Munich – although his approach is risky, the field at the Vaughan Sportsplex is neither wide nor long. The Spaniard encourages his fullbacks to surge into advanced positions, while his midfield players drop deep to dictate the tempo of the match.
Alaba and Lahm are higher up the pitch out wide, and Thiago dropped deep. In this screenshot he’s about to play a pass to Lahm, so he can drive forward.
However, while the generic shape is a 2-1-2, the aim of this system is to end up in a 1-2-2. Ball retention is pivotal, and even though this system could be somewhat conservative, if executed properly, it’ll lead to success.
Without the ball
The most important feat regarding success in 5v5 matches is your shape when your opponent has possession. Your side can field a lineup with a strong attack, but if they’re disjointed as a unit without the ball, there’s a good chance that you won’t succeed over the long-term.
More so, shape is a factor that most teams tend to overlook – but little do they know that your defensive shape wins you the big games, especially against superior opposition. Defending at the Sportsplex should be fairly simple – based on the size of the field, assigning each player a man would be the easy route to take.
How Bosco should be set up on goal kicks and when the goalie has the ball
The first area that needs to be addressed is defending your opponent’s goal kick or when they opt to play passes to their goalie. This is the only time Bosco should press high. The forwards should close their defenders – midfielder on midfielder and the defenders should keep tight on their attackers. The main goal is to force the opponents goalkeeper to concede possession, and if this press is executed properly then there’s a 99% chance he will.
Apart from those scenarios, Bosco should NEVER press high or press the goalkeeper, unless you’re confident you’ll steal the ball or force him to concede possession. Defensive solidity, organization and cohesion are pivotal in a 5v5 match, and majority of the time it makes a difference.
To avoid being overrun in midfield, or dragged out of position, it’s important that the strikers drop a few yards away from the opposition’s defenders. The aim is to stay compact, and force your opponent to work hard to break your backline down. Regardless of the situation, the attackers should always be behind the ball, which requires improved work-rate on both ends. Below I break down two scenarios that are likely to occur.
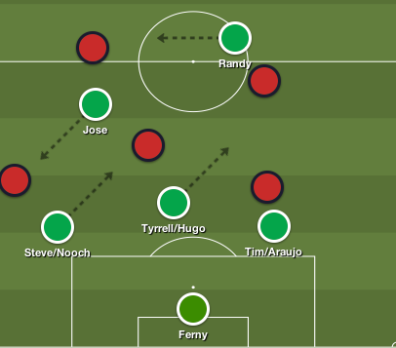
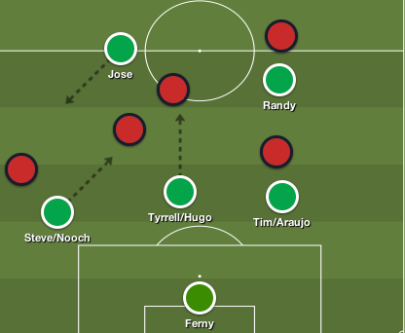
Our shape if the defender beats Randy
Here, the right defender evades Randy’s press. The wide men is the least threatening player so Jose should drop back to cover him, while Randy picks up the left defender. Steve/Nooch should press the opposition’s midfielder, while Bosco’s midfielder should close down the opposition’s right defender.
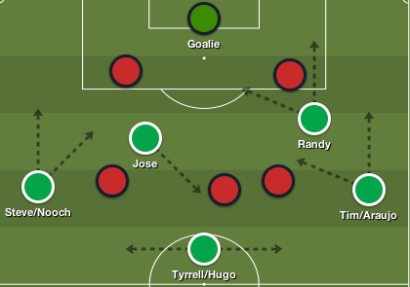
If Claudio/Jose gets beat by a defender
Another situation would be Jose/Claudio getting beat by the left defender. Here we still want Jose/Claudio to hustle back and cover the player out wide and Steve/Nooch to close down the midfielder. Bosco tends to concede fouls when their forwards relentlessly track back in attempts to win the ball from the defender that beat them – this gives them the responsibility to keep wide player on their flank, and ensures that the three defenders protect central areas.
In Bosco’s most recent fixture, this defensive model was displayed in the second half after going down 4-1. Subsequently, the opposition failed to threaten Bosco’s goal for the rest of the match. Coincidence?
Midfielder
The 2-1-2 Bosco intend on playing leaves the midfielder with a huge task on both ends – as stated earlier, this player is practically a box-to-box midfielder. Although that isn’t necessarily a bad option when playing inferior opposition, the idea of playing a box-to-box midfielder in a single pivot can be suicidal.
This formation abandons that philosophy – the midfielder in this approach needs to be tactically disciplined, as he’ll be somewhat of a deep-lyer. The main responsibility this player withholds is dictating the tempo of the match. This player is effective when the ball is at his feet. He drops deep to receive the ball and build play, but he’s also required to constantly string passes together, in search of openings.
Here you see Thiago dropping deep. This allows Alaba and Lahm to push forward, but the centre back the freedom to play long diagonal balls. Also if Lahm or Alaba lost the ball in their zone, Thiago provides defensive cover when either centre back is forced to sweep up.
On the defensive end, he drops deep to become the third defender. Many can see this as an impractical approach, but this is important because it ensures that Bosco always has a numerical advantage at the back.
In the past Bosco has relied on their midfielder to be their attacking thrust, and in certain situations he should be, but this role allows him to be beneficial to Bosco’s overall play. By no means is the midfielder shackled to tactical instructions – indoor soccer provides a lot of openings and chances to break on net, and the midfielder should only push forward when the opportunity is certain.
Finally, teams will be keen to press the midfielder out of the equation, but as the match progresses and players tire, he’ll slowly be handed the space to influence the match. The key is patience – most games are 50 minutes, and in reality the midfielder might take 10-15 minutes before he begins to dictate the tempo. He’ll receive the ball higher up the pitch, but his significance increases once he picks up the balls in pockets of space or at the edge of his own box.
In short, the midfielder’s role in this system is more defined – if he fulfills his duties, the chances of his side’s success increases. He needs to be disciplined, calm, a leader, and defensively astute – yet his ability to play incisive passes and eye for goal must be proficient.
Attacking philosophy
This system instills a sense of defensive solidity, so some may fear that Bosco’s approach going forward will be conservative. In fairness, this may be the case, but if you’re not attacking on the break, the intent should be to move up the field as a cohesive unit.
Virtually, Bosco should be a 1-2-2 when they’re possession. In order to do this, they must focus on ball retention. An issue Bosco encounters on the attack apart from a lack of movement would be their persistence to force passes. They continuously force long balls over the top, or attempt to squeeze penetrating passes into tight areas.
Here, we see the Bosco midfielder as the last man – his job is to circulate the ball around the field, but also move laterally to provide a passing outlet for wide players that have no forward option. Bosco defenders seem to be hesitant with playing the ball backwards, but they should ALWAYS drop the pass back to the midfielder or the goalie if a passing lane isn’t available – the same goes for corner kicks, as the chances of completing a successful cross into the box is slim.
The longer Bosco holds possession, the less defending they have to do, which conserves energy levels. Likewise, not every pass needs to go forward. There’s nothing wrong with restarting the play and going back to your goalie or back to the player who initially played the pass. You can’t concede a goal if you have the ball, which is why possession is vital. Passing lanes will eventually open, legs will tire, and chances will be created, but Bosco needs to monopolize possession in a professional manner.
When the midfielder drops deep to receive the ball in any situation, the two defenders should be pushed into advanced positions. Majority of the time, this will create 3v2 situations and their will always be an outlet for the midfielder to play into. But the advanced positioning of the defenders is key, because it pegs the opposition into there half, as they now become an offensive threat.
How Bosco should be shaped when they enter the oppositions half.
Essentially, the Bosco defenders are auxiliary inverted wingers on the attack. They have two options when pushing forward – they can either cut in and shoot, or drive forward and stretch the field. Each Bosco defender has the tendency to cut in and shoot, and while this is encouraged, the opposite winger’s job is to stay wide and stretch the field. Also, the defenders have to be disciplined with their movement, as they’ll be required to transition from attack to defence quickly to support the midfielder, if they’re caught on the break. However, if Bosco can sustain possession in a 1-2-2, their defenders will maintain high energy levels, and sprinting back into position won’t be difficult.
Bosco currently have three strikers at their disposal, and you can argue that they haven’t been utilized properly. Claudio is a pacy, dynamic attacker, Jose is a hardworking space invader, whilst Randy is a genuine poacher.

Identical diagram to the one above, but now we’re highlighting the attackers.
Here, Jose and Randy are the two strikers up top, and Claudio would preferably slot into Jose’s spot, because they somewhat pose a similar threat. The diagram above encourages Jose to drop deep into space, and then subsequently move out to the flanks and push forward. Jose’s movement is key because it drags a defender out of position and allows either a defender or the midfielder to attack the space.
Jose/Claudio’s movement should be varied – dropping deep into the midfield and drifting over to the wing is encouraged, but most of their energy should be dedicated to their defensive duties. You should NEVER tire yourself out when Bosco has possession of the ball.

The midfielder won the ball and sprints forward to put himself in a 2v2 situation. Jose is encouraged to make a diagonal run to drag the defender with him – this allows the midfielder to isolate the defender in a 1v1 scenario.
Also, Jose/Claudio play a pivotal role on the break if a midfielder or defender surge forward. There job is to make an opposite run from the ball carrier to drag a defender out of position, and give the carrier half a yard to make a pass or shoot.
Randy’s position is unique – no player on the team possesses the ability to get into goal scoring positions like him. This system will free up space for the midfielder to locate Randy and the defenders to take shots, which can potentially lead to rebounds for him to pick up. Randy needs to get to/near the box frequently, but he also needs to be aware of the space that Jose is creating for him to run into. If Tim/Araujo cut in, Randy will make a straight run into the box, but if the right defender provides width then Randy should make a diagonal run towards the box.
Conclusion
“Whether detailed or vague, good or bad, effective or ineffective, all football teams try to play a certain way to win.”
Richard Whittall, soccer features writer at theScore.com, stated that in his weekly ‘The Skeptical Tactician’ column, and frankly, it’s true. Bosco currently play a high-octane game that allows them to score, but there’s also heavy reliance on individual brilliance.
This system presented allows the forwards to be scrappy, the midfielder freedom to dictate the match, and gives the defenders a chance to express themselves in an attacking sense. Now, it will take time for Bosco to adapt to this system, but it’s a system that should lead to success over the long-term.
Furthermore, the system ensures defensive solidity and organization at the back, yet it requires patience, cohesion and possession to reap rewards.